
Website Pages
The Pages button gives the administrator access to a listing of all pages currently in use on a particular site (selected at the top center pull-down). Pages are shown in hierarchical order.
On this page the administrator can add, edit, move, copy, or delete pages.
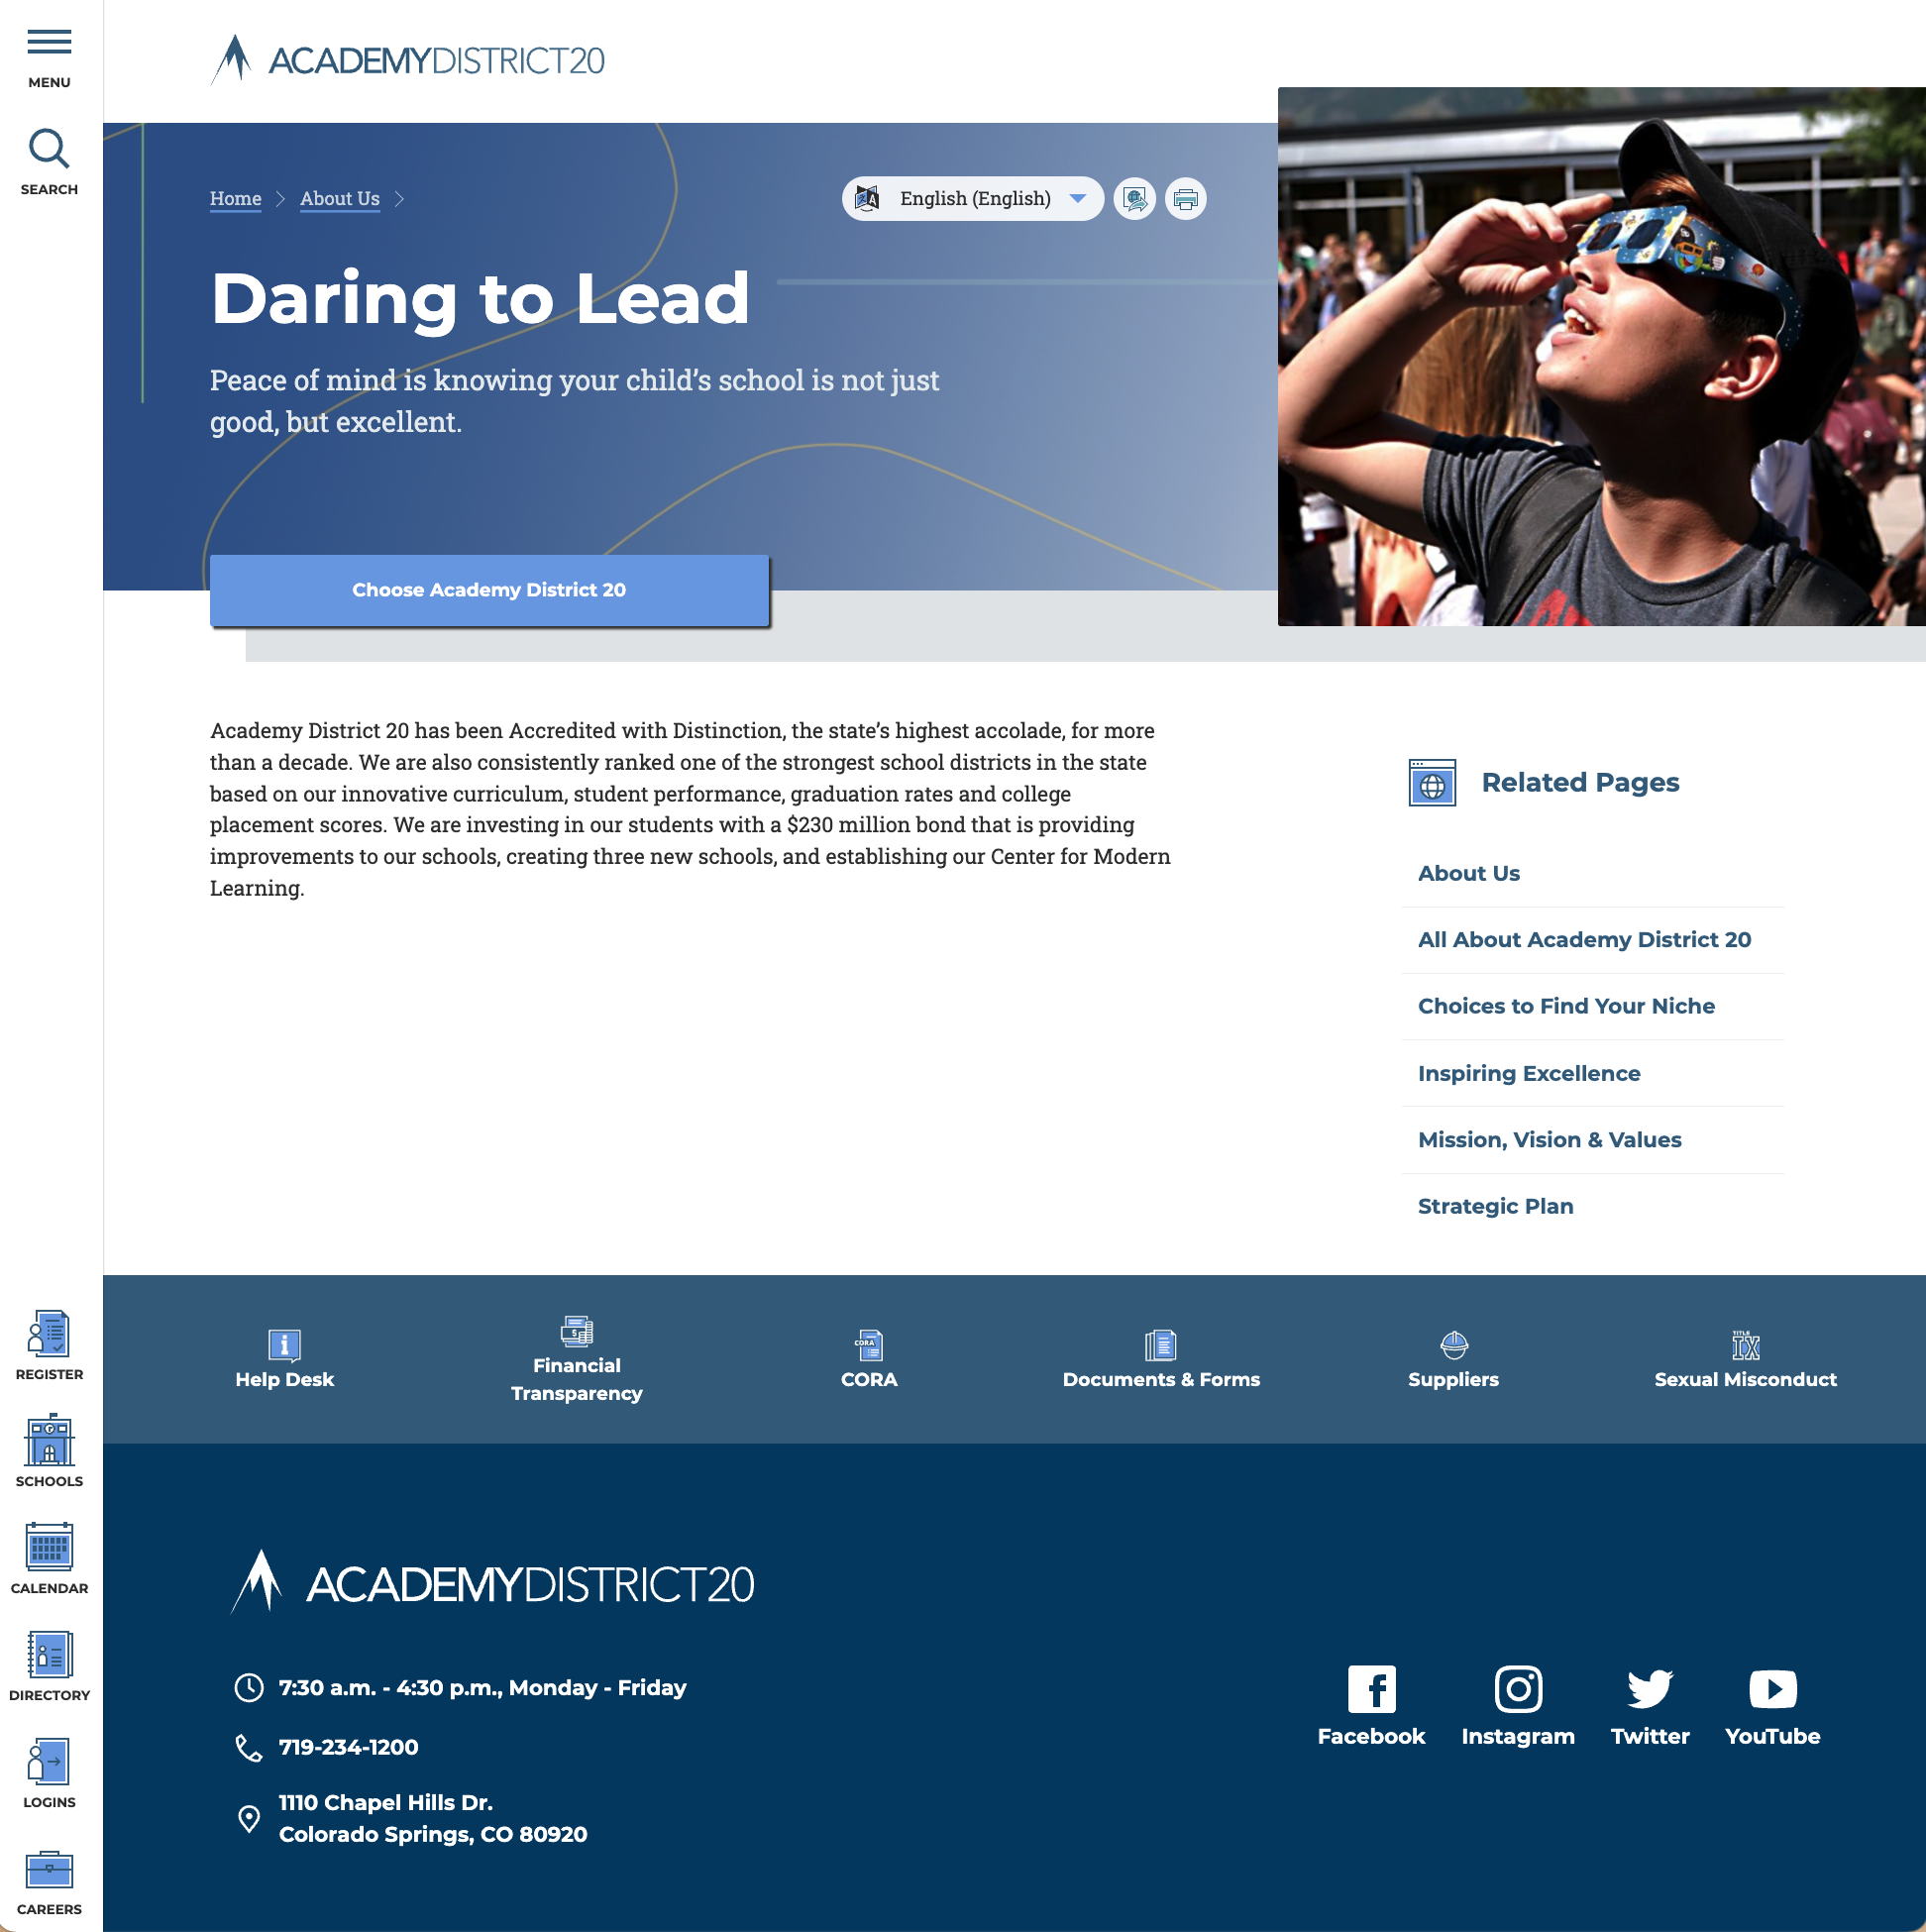
What is a Page?
Website pages are the main container of information on a website. Pages are constructed automatically when the website is published. There is no manual placement of content on a webpage. Instead, the page template, along with messages, links, feeds, and various other settings assigned to the page, will determine how the page looks and behaves once the website is published. Page design is done at the template level as part of the User Interface (UI) module of the website.
Adding or Removing Pages
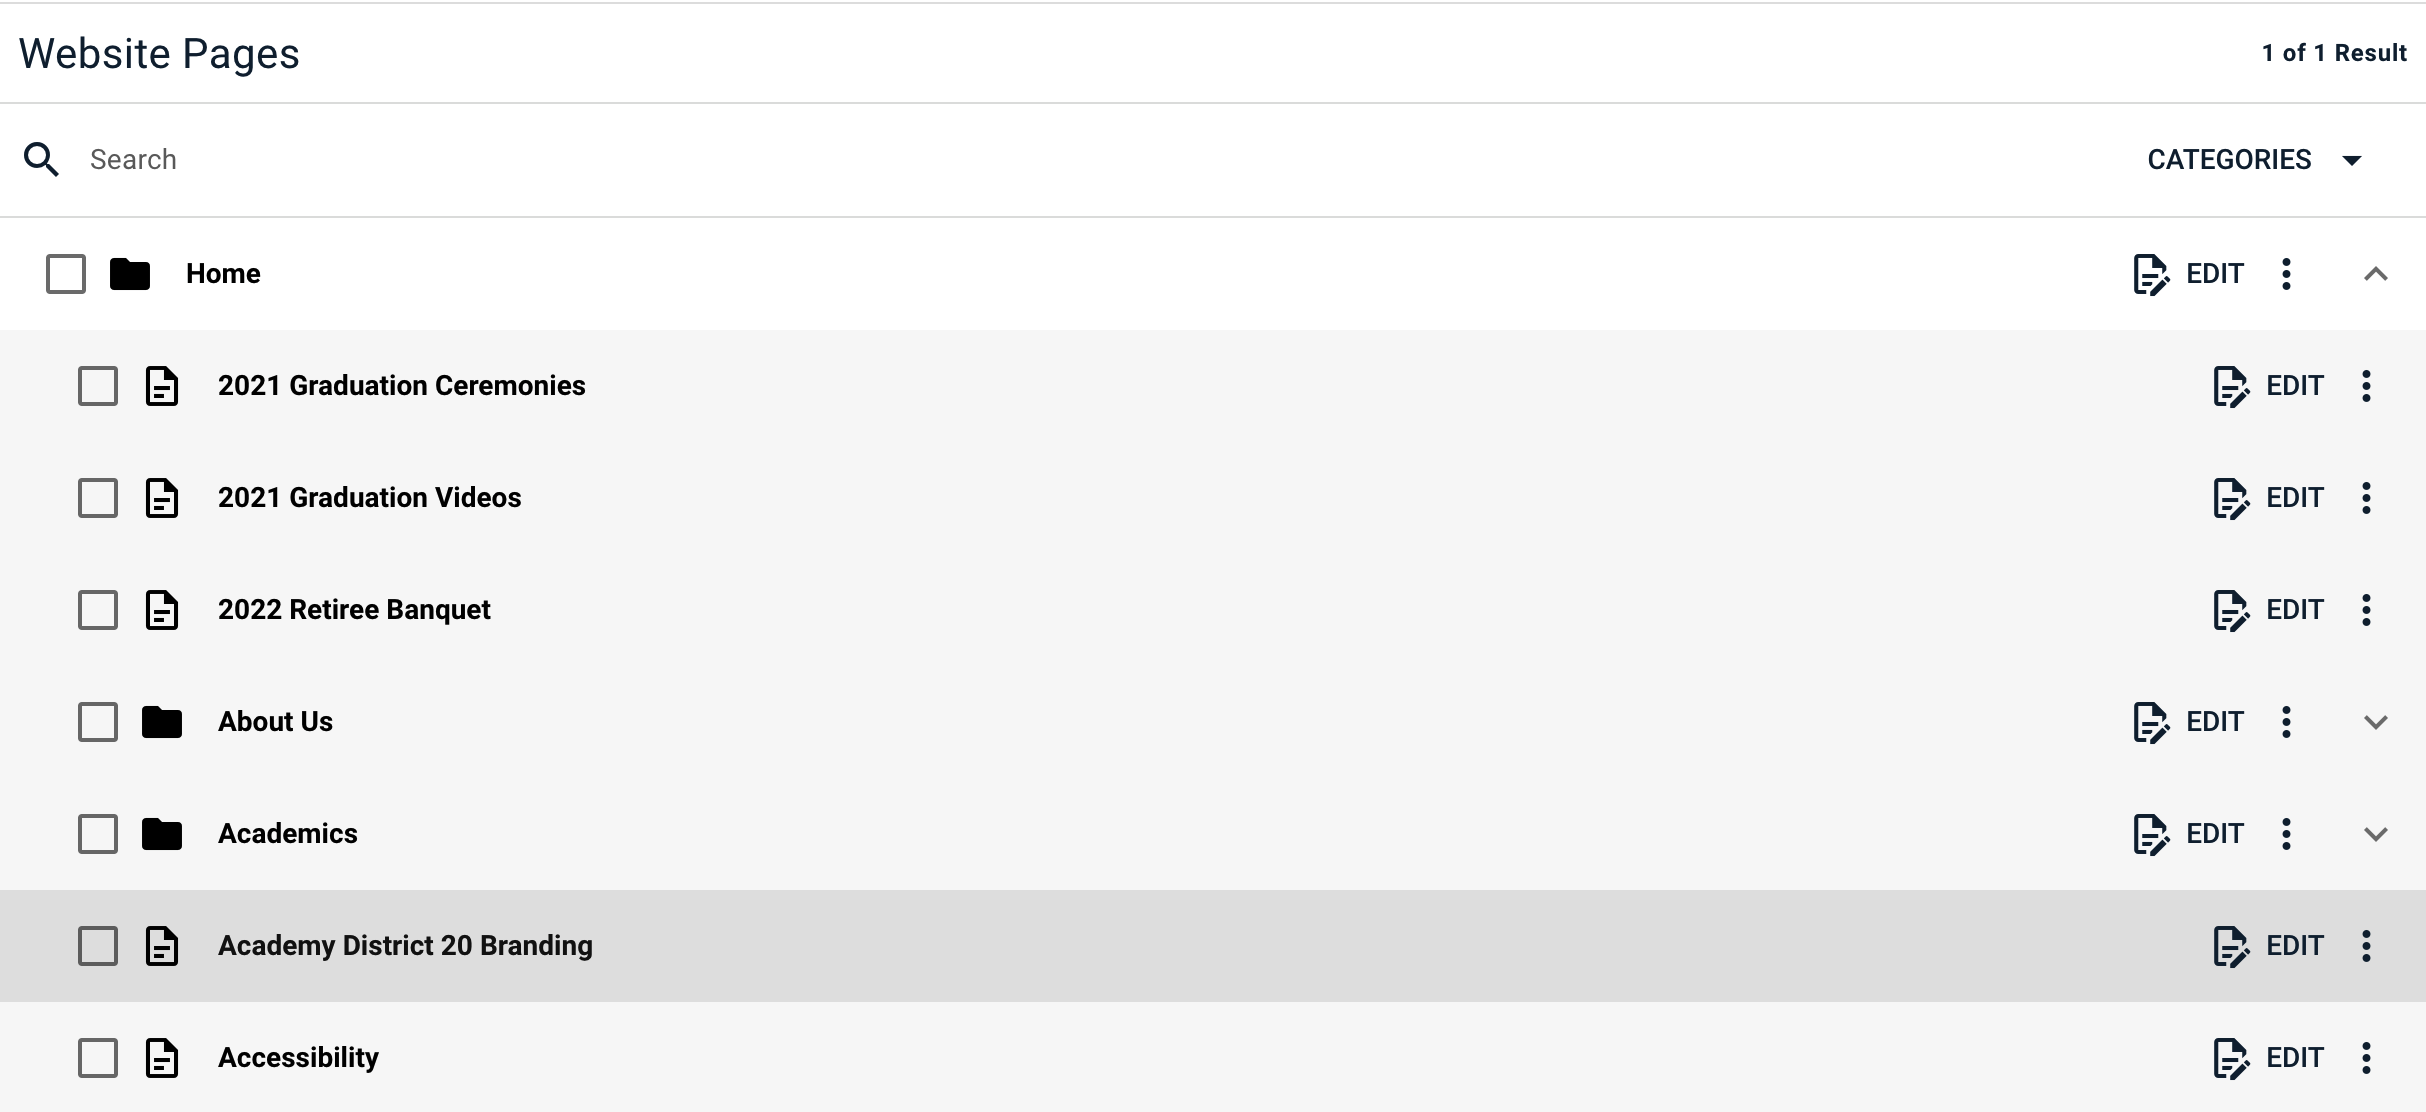
Pages can be added or removed using the button with three vertical dots to the very right of the page name. Each page has the option to create a sub-page, meaning that the new page will be hierarchically below the current page.
Moving and Copying Pages
Use the page action menu or select one or more pages and use the bulk action toolbar to move or copy pages.
Move
Moving a page changes its owning organization and/or parent page. Choose the destination school or organization, then choose the destination parent page if the page should live under another page.
Copy
Copying creates a new page with the same content, settings, links and page structure. The copy workflow checks for destination URL conflicts and warns when a page includes message content owned by another non-district organization.
Copy to Multiple Organizations
When copying a single page, administrators can select Copy to multiple organizations. Choose the destination schools or organizations and CommCenter will attempt to copy the page using the same relative URL and page hierarchy as the source page. If a matching destination path does not exist, that destination is skipped and listed in the copy warning.
Multi-organization copy is intended for controlled district-wide or cross-school page rollouts. Review any warnings after the operation before assuming every destination was updated.
Search Keywords
Search Keywords connect specific search terms to pages. Site search can already find a page by title, but keywords help with alternate words, common abbreviations, program names, or terms families use that do not appear in the page title.
Editing Keywords on One Page
Open a page and use the SEO tab to add or remove Search Keywords for that page.
Bulk Search Keywords
The Pages list includes a Search Keywords tool in the bulk action toolbar. Use it to add, remove, or replace search keywords across multiple pages.
Bulk updates can target:
- Selected pages: update only the pages selected in the list.
- Rule-matched pages: update pages matching a URL segment and/or title text, optionally scoped to an organization.
Before applying the update, CommCenter shows matching pages and their current keywords. Review the preview carefully, especially when the rule is scoped to all organizations.
Page Anatomy
Once a page is created, the following elements can be added to the page:
Content tab
Messaging content may be added here.
- Use the 'Add Content' button to add existing messages that have already been made.
- Use the 'Create Content' to add content on the fly (not recommended.)
- Messages may be edited (using the edit button) or removed (using the button with three vertical dots)
SEO tab
Page metadata and search terms may be added to the page:
- Title: Add the page title. This is the title of the page in the CommCenter, not the title of the page as it will appear on the website. The page's visible title on the website is determined by its messaging.
- Description: The description is the metadata that will be used by search engines to summarize the page.
- Search Keywords allows certain terms to be assigned to the page, ensuring that if those words are used in site search, the page will be found. Site Search can find the page based on a title search, however, this method allows specific terms to point directly to the page.
- Categories for the page cannot be edited, however, this section will show categories that are assigned to the page based on the messaging that is assigned.
- Parent Page: Although the page's heirarchy was likely set when the 'Create Page' button was used, the parent page can be reset here if needed.
- URL Slug: The URL slug for the page will be created automatically based on the title. Certain characters may be stripped out to ensure a valid URL is created. Although automatically created, the URL slug can be edited here if needed.
- Path: This shows the relative page of the page based on the URL slug. This display is for information only and cannot be edited.
Settings tab
On this tab, the page's template, ownership and feeds are set.
Templates
There are a wide varity of templates available depending on the intent of the page. Not all templates are described here, but the primary ones are:
- Article Digest page: a page for showing a summary of features/stories.
- Article List page: a page for showing a summary of announcements.
- Detail page: the most common type of page; shows a single message title, summary, and details, along with any feeds below. Image/Video galleries are supported.
- Detail page (alternate): same as the Detail Page above, but feeds are moved to the top of the page right below the header.
- Landing page: perfect for 3+ messages and requires a separate message as a header. This type of page is meant to be a wayfinding page where a reader can quickly glance at summaries of related messages in order to drill down to more specific content.
Ownership
If teams have been created for the website (see the Directory section), one of those teams can be assigned as an owner of the page.
Website Feeds
Several types of feeds may be assigned to the page:
- Announcements
- Events
- Features/Stories
- People
- Files
Feeds cannot be added to the page until it has been published at least one time.
Announcement and Feature/Story feeds will require the creation of a summary page where all announcemnts/features can be seen at once. These are created using the Article List (announcements) and Article Digest (feature/story) templates. Typically a horizontal feed will only display the most recent 10 items. Older items will be viewed on these summary page(s).
Adding a feed:
- Click the '+ ADD' button at the bottom of the settings window.
- Choose the type of feed using the 'Type' button at the upper right of the Select Configuration window.
- Choose the 'WEBSITE FEED' that appears in the window. The added feed will appear in the Website Feed section.
- For Announcements/Features/Stories feeds: click on the title of the feed and provide the following:
- Title: This is the feed's heading on the page.
- See More Link: This is the URL for the announcement/feature summary page
- Link Label: The title that will appear on the button to see the announcement/feature summary page
- Keywords: if there are keywords necessay to populate the feed, fill them in here (generally not needed.)
- Organization(s): Enter the organization (school) where the announement/features will come from.
- Tags: add any tags that are necessay to populate the feed (this is a free text field; press enter after each tag.)
- Categories: add any categories that are necessay to populate the feed (this is a free text field; press enter after each category.)
- Limit: limits the number of announcements/features to be shown. For a feed on any template except 'Article Digest' or 'Article List', set this to 10. For the Article templates, set to 100.)
- For an Event feed: click on the feed title and provide the following:
- Title: This is the feed's heading on the page.
- Keywords: if there are keywords necessay to populate the feed, fill them in here (generally not needed.)
- Link: the event feed comes with a "See All Events" button which will allow the visitor to see the full calendar for this feed. Enter that link here. The most common link is obtained by opening the ASD20 Calendar App from the district website (asd20.org). Navigate to the specific calendar view for the feed you want to add. Copy the URL from the browser window and paste it here.
- Label: the standard label for the Event feed is 'See All Events'. Add a custom button title here if needed.
- Categories: if the feed needs to have greater specificity, enter applicable categories (generally not needed.)
- Limit: limit the number of tiles to be shown (typically 10.)
- For a People feed: click on 'Add Feed' and provide the following:
- Title: Fill out a title for the feed. The default is 'Related People'.
- Link: the URL destination if a link is to be added to the feed.
- Link Label: the button title for the link above.
- Limit: limit the number of people to be displayed if desired.
- Organization: choose the organization(s) that the people feed will populate from
- Group: choose a specific team to populat the feed from (this is the most common chioce.)
- Titles: sort the feed by titles if desired.
- Specific People: add specific peopel to the feed if they do not match any of the filtering above.
- For a File feed: click on 'Add Feed' and provide the following:
- Title: Fill out a title for the feed. The default is 'Related Files'.
- Keywords: if there are keywords necessay to populate the feed, fill them in here (generally not needed.)
- Organization: choose the organization(s) that the people feed will populate from
- Owners: choose the owners of the documents (if they were assigned.)
- Categories: add any categories that are necessay to populate the feed (this is a free text field; press enter after each category.)
- Tags: add any tags that are necessay to populate the feed (this is a free text field; press enter after each tag.)
- Limit: limit the number of files to be displayed if desired.
- Checkboxes: Date/Owner/Category/Tag - choose whether to further sort the feed by these items (generally one is sufficient: Date or Category)
Links tab
On this tab, additional links may be added (in addition to those present in messaging.)
Page level links are helpful when the page is using shared content. For example, the message may be a district level message about school fees, but might be very generic in order to use it on multiple school sites. Page links can be added to put more specific school content (a specific school fee schedule, for example) on the page while still allowing the generic message to be used.
Page level links may be:
- Call-to-Action: these links will show up in the page header
- Link: these links will show up on the page's right side-bar